RV-9A: Left Fuel Tank - 5/26/2006
Home Previous Entry Next Entry Back |
Share on:

|
|
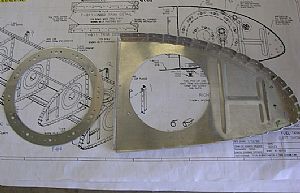 Cut the hole in the inboard rib for the access plate cover Cut the hole in the inboard rib for the access plate cover
I used the T-407 ring as a pattern to draw a circle on the rib with a blue sharpie. The instructions say to use a fly cutter for this large hole. My fly cutter needs a new blade, so I decided to use my Unibit in my drill press to start the holes around the outer edge of the hole. After making a complete circle of holes, I popped the center out and finished off the edge of the hole with my bench sander that has a narrow circular sandpaper belt.
|
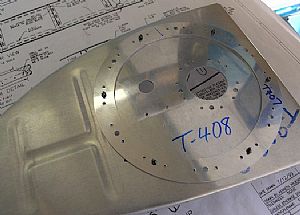
 Getting ready to drill platenut screw holes in the rib Getting ready to drill platenut screw holes in the rib
The instructions say to use the T-408 cover plate to drill the screw holes into the rib, making sure the flat end of the plate cover aligns with the stiffener bead (whatever the hell that is). I assume that they mean the vertical indention in the front part of the rib. To help with the alignment I put the T-407 reinforcement ring on top of the T-408 cover plate and drew a sharpie line on the cover plate. This should help line things up better for drilling the screw holes.
|
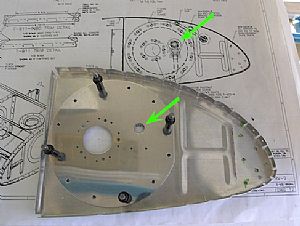 Drill the platenute screw holes into the rib Drill the platenute screw holes into the rib
This was little tricky. I lined up the straight end of the outer circle of the acces plate with the vertical indention of the rib and then while holding that position, flipped the whole thing over and lined up the access plate with the large hole I cut previously, using the sharpie lines as a guide. After flippin' and adjustin' several times, I drilled my first hole and put a cleco in the hole. Then it was just a matter of drilling the other holes, making sure I stayed on my blue sharpie line on the access plate. The green arrows are a reminder to me to make sure the the fuel line hole in the access plate matches the drawing when I start on the right fuel tank.
|
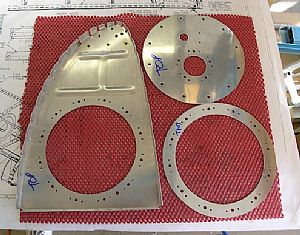
 Drilled all of the platenut rivet attach holes Drilled all of the platenut rivet attach holes
I took the T-408 access plate off and put the T-407 reinforcement ring on the rib with my brand spanking new black clecos. Then I drilled all the attach holes with a #40 drill bit.
|
 Finished! (this part anyway) Finished! (this part anyway)
Next I will dimple the platenut attach holes in the rib and countersink the attach holes in the T-407 reinforcement ring. Then it will be time to rivet the rib, reinforcement ring and platenuts together.
|
Home Previous Entry Next Entry Back
|


