RV-9A: Top Skins and Baggage Area - 7/13/2009
Home Previous Entry Next Entry Back |
Share on:

|
|
 Hot, Hot, Hot! Hot, Hot, Hot!
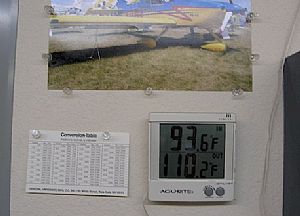
Holy moly! It's 2pm on a hot Texas day. I have my insulated garage door closed and my portable air conditioner running along with a floor fan. 93 degrees is as about as cool in the garage it's going to get, but I have missed working on the RV so I'm just going to sweat it out.
|
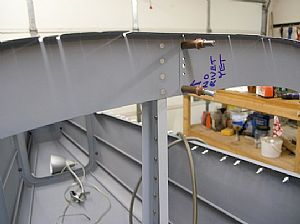
 Riveted the F-728A vertical channel to the F-706 bulkhead Riveted the F-728A vertical channel to the F-706 bulkhead
This was a little tricky getting to the rivets in and around this channel. I had to use my curved rivet set on the rivet gun to get some of the rivets, along with the bucking bar. Also, there are four 3/32 rivets at the bottom of the channel that get riveted to the outer bottom skin. I will need to get my bucking buddy Norwood over here for those dudes. While I was here I finished riveting the baggage compartment floor ribs to the F-706 bulkhead. The instructions don't say when to these guys, so I just did them.
|
 Riveted the top of the F-728A vertical channel to the F-706 bulkhead Riveted the top of the F-728A vertical channel to the F-706 bulkhead
The instructions say that it's OK to just use pop-rivets here because of little working space, but I didn't have any problem getting these rivets in. I put my small no-hole yoke on my pneumatic rivet squeezer and put the rivets in.
|
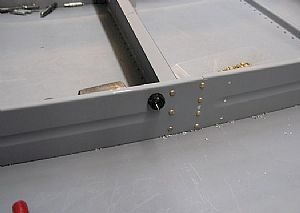 Riveted the F-729 floor angle in place Riveted the F-729 floor angle in place
I almost forgot this part. The pneumatic squeezer made quick work of this.
|
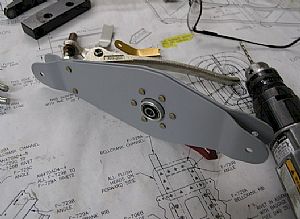
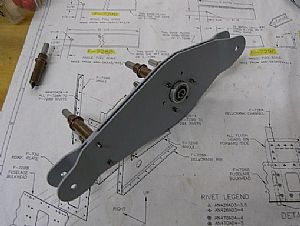 Started work on the F-635 Bellcrank Started work on the F-635 Bellcrank
This was pretty straight forward. After located the parts, I primed them (except for the VA-146 flange bearing) and riveted it all together.
|
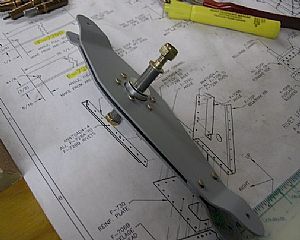
 Here's the finished product Here's the finished product
|
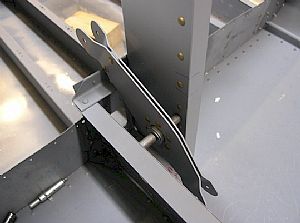 Made the tubular F-635C spacers and fit the bellcrank to the fuselage Made the tubular F-635C spacers and fit the bellcrank to the fuselage
No surprises here. Good fit.
|
 Time to store the bellcrank away Time to store the bellcrank away
|
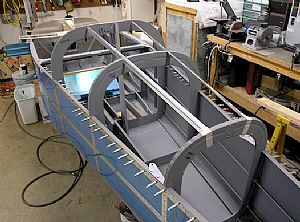 Put the stringers in place Put the stringers in place
I had already made two F-786A J-Stringers in a previous session. I drew a centerline on the upper faces and taped them to the rear most bulkhead. The instructions say to tape them to the F-706, 707 and 708 bulkheads. This didn't any sense to me since the stringers must be allowed to float freely over the front 2 bulkheads while the outer skin determines their placement in the front bulkheads. If this doesn't make sense to you, it will when you get to this part.
|
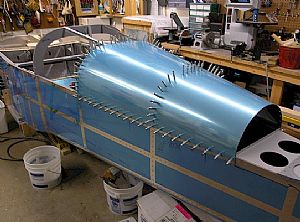 Clecoed on the F-775 Rear Top Skin Clecoed on the F-775 Rear Top Skin
This is cool!! I started at the center of each bulkhead and worked my way down each side, finishing the clecoing into the longerons.
|
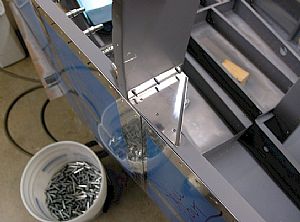 Clecoed the F-656-L&R gusset plates in place next to the F-706 & F-707 bulkheads Clecoed the F-656-L&R gusset plates in place next to the F-706 & F-707 bulkheads
The instructions say to "Cleco the gussets to the bulkhead and use the pre-punched holes to drill them to both the bulkhead and the longeron." That's just nuts. The bulkhead in the most forward position moves around freely and there is no way to determine exactly where the gusset will get drilled to the longeron until the skin is clecoed on. The skin holds the bulkhead in it's correct final position. I will cleco the gussets to the bulkhead and then clamp the bottom of the gussets to the longeron after the skin is clecoed on. Then when I take the skin off, I will final drill the gussets to the longeron.
|
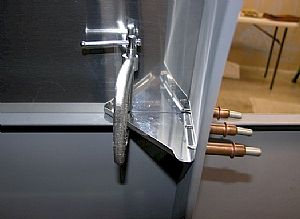 Here's the gusset clamped in position Here's the gusset clamped in position
This way the skin determines where the gusset gets drilled into the longerons.
|
Home Previous Entry Next Entry Back
|


