RV-9A: Tailcone - 7/25/2008
Home Previous Entry Next Entry Back |
Share on:

|
|
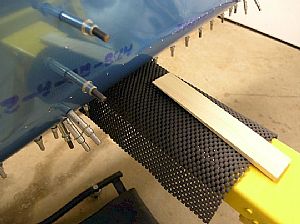
 Getting ready for the final drilling of the skins Getting ready for the final drilling of the skins
The instructions talked about a plumb-bob for keeping things in line, but I decided to use my digital level to make sure things were sitting level for the final drilling. It seems to me that the most important thing is find a way to keep this dude from moving around while drilling the holes.
|
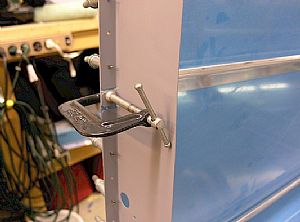
 Here's my solution for non-movement of the tailcone Here's my solution for non-movement of the tailcone
I used some of that black rubbery stuff that you put in the bottom of your tool boxes (or that stuff you put under your throw rugs to keep them from sliding around).
I cut two strips of the rubber and layed them on top of sawhorses. I also duct-taped the sawhorse feet to the floor of the garage. All this keeps the tailcone from scooting around on the sawhorses. Since the bottom of the tailcone is oval-shaped, I got some shims from Lowes Aircraft and Lumber Supply and put them on each side of the tailcone under the rubber matting. This kept the tailcone from rocking side to side. After a final check for level, I was ready for drilling the skin.
|
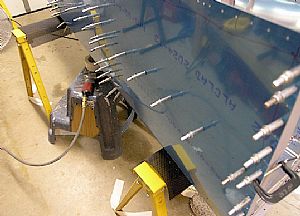
 Time for drilling the J-Stringers Time for drilling the J-Stringers
I knew that this was going to be a little tough. I also wanted to make damn sure I didn't drill my fingers while drilling these holes. I started off by clamping one of the J-Stringers to the front bulkhead, making sure that the line I drew on the back of the J-Stringer was showing through the holes in the outside skin.
|
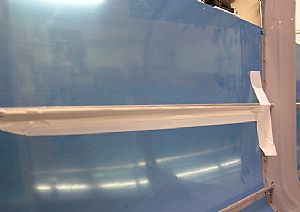 Tape time! Tape time!
I have gone through 2-3 of rolls of duct-tape working on this project. Here I put a strip of duct-type on the second bulkhead in a vertical position, making sure to line up the skin holes with the J-Stringer line. Then I put a long strip of tape over the flange of the J-Stringer to help hold it against the skin. Then I started drilling the holes from fore to aft in every 5th hole. The tape was loose enough to allow me to shift things a little to get the J-String lined up. Before I drilled, I looked over the skin to make sure that my fingers were spread out with the hole to be drilled between them. I'm not going to drill them fingers! Between the pressure of my fingers and the duct tape, the holes were faily easy to drill.
|
 Looking good! Looking good!
2 more J-Stringers to go...
|
Home Previous Entry Next Entry Back
|


